
Happy New Year’s Eve guys! Any big plans? We highly recommend a DIY balloon drop, some kid-friendly mocktails, and filling out our free year-in-review/family resolutions printable for a fun-filled night with the kids.
Then, once those shannigans are through and the kiddos are finally in bed, it’s time to take a moment to reflect on the year-to-be.
What are you hoping to accomplish in 2015?
A more simplified home? More time to connect with the kids? Or maybe you just want to finally do something with all those photos on your phone? Whatever it is – we’re here to help.
It’s become a bit of a tradition around here to focus on some helpful life hacks in January (it’s a nice compliment to our annual Project Organize Your ENTIRE Life printables and eBook sale this time of year).
This year we’ll be focusing on 4 main topics:
- home organization (of course!)
- mindful parenting
- meal planning
- memory keeping
Today we’re kicking it all off a day early (see how organized we are already!) with a simple and modern POYEL project that will help you get your kitchen in order.
Along with tidiness of it all, I also love that this one encourages me to keep all the healthy stuff – quinoa, barley, steel-cut oats, protein powders, etc. – out and and proudly on display. (An idea I’ve been big on ever since we made our DIY Clean Eating Gift Pack).
Here’s Julee with the goods…
Over the holidays I decided to tackle a project that was on my to-do list since moving into our new home last year: make better use of our open kitchen shelves.
When we first moved in, I went the decorative route. I displayed vases, candles and rarely used items like pitchers and cocktail shakers. Very quickly, however, I decided I wanted to take a more functional approach to the space.
Since I use the area near the shelves for baking (and coffee making), I decided to focus the storage on pantry staples like flour, sugar and salt. I also decided to dedicate one shelve to storage and keep the remaining two shelves more decorative, just to ease into to things a bit.
My first step was to select storage containers. I knew I wanted a minimal, clean look but I also love labelled containers.
I choose a set of simple cylindrical jars and also decided to etch labels onto the glass using Martha Stewart etching cream. The transparent etched glass allows the containers to be labelled without adding too much visual clutter, though you can use the Martha Stewart glass paints if you want a more pronounced effect.
Designing the Containers
Creating the etched glass containers was much easier than I expected. I started with the following materials:

- Martha Stewart Etching Cream and Brush set
- Glass containers (similar set can be purchased online here)
- Masking tape
- Martha Stewart Adhesive Stencil set
- Rubber gloves (not shown)
The instructions on the etching cream are very easy to follow. After washing the containers, I completed the following three steps:
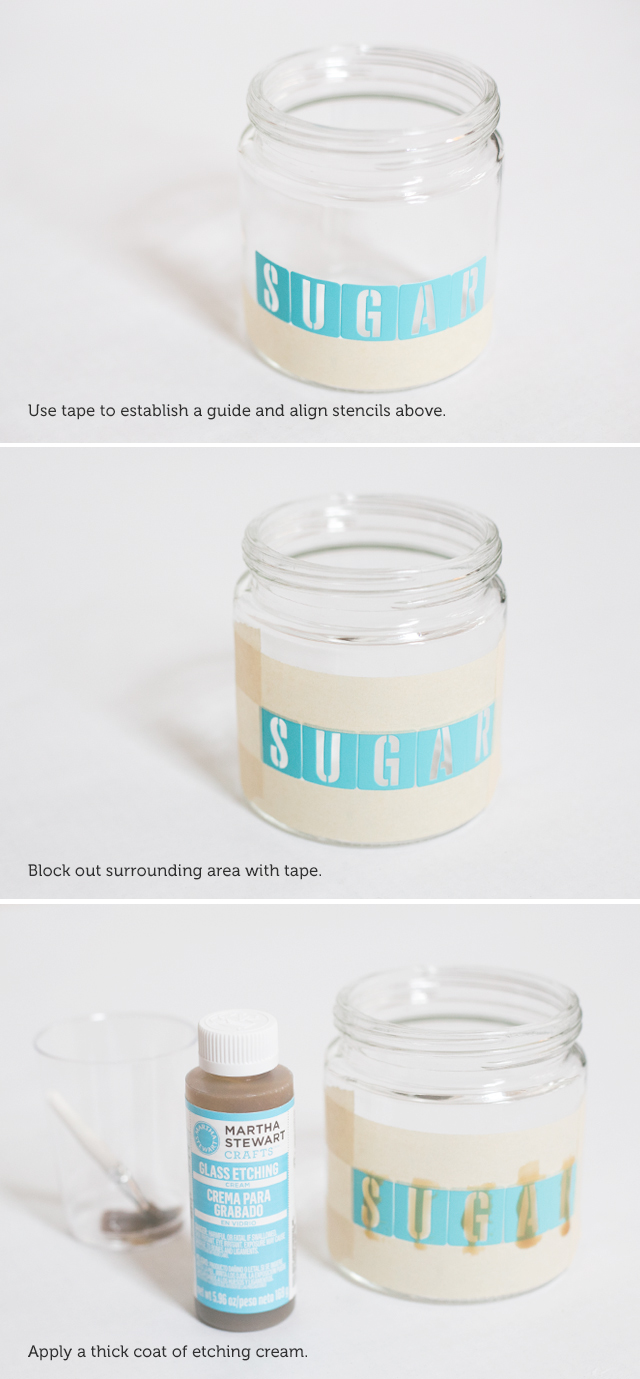
- Place a piece of masking tape along the bottom of the container to create an even line and then position the stencils along the top of the tape. The stencils have a reusable adhesive backing and they stick to the glass extremely well.
- Cover the surrounding glass area with tape so that the etching cream doesn’t spill into unintended areas.
- Brush on a thick layer of etching cream over the letters and wait 15 minutes.
The etching cream instructions recommend wearing rubber gloves throughout the entire process, but I wore the gloves only while rinsing the cream off at the very end.

Once my containers were etched, washed and dried, I started filling them with baking staples. I currently have 2 large containers and 6 small containers on my shelves, but I’m already planning to add more now that I see how much I like – and use – the completed storage area.
Here’s the final result in my (cleaner-than-usual) kitchen:

Designing the Open Shelving Display
The final display on the shelves maintains a clean, minimal look while still adding quite a bit of functionality. A couple of tips I kept in mind while arranging items on my open kitchen shelves:
- A neutral and limited color palette helps avoid visual clutter.
- Varying heights and textures helps add visual interest.
- Repetition of like shapes and colors creates a sense of balance and harmony.
- Less is usually better. While I want the space to provide storage, I also want it to look nice. Finding balance between the two goals seems to be key to open shelving.
*Post contains affiliate links.
Get Your Free Printable

Subscribe to our newsletter today and get our free printable... No More, "Mom, I'm Bored!"