Modern Parents Messy Kids

We're all about finding ways to make family life better while keeping our sense of humor. Check out our famous MPMK Top Toy Awards, already viewed over 7,000,000 times!

  • Start Here
  • Travel
  • The Kids
    • Our Famous Toy Gift Guides
    • Play Activities & Art Ideas
  • The Home
    • In the Kitchen
    • Project Organize Your ENTIRE Life
      • Cleaning House
      • Meal Planning
      • Decluttering
      • Organizing
      • Schedules & To Do Lists
      • Daily Rhythms
    • The Holidays
    • Photography & Memory Keeping
  • Parenting
    • Parenting Discussions
    • Happy Family Habits
    • The Book Nook
    • Mom Health & Beauty
You are here: Home / The Make & Play Vault / Art + Kid Crafts / Paper Bag Luminaries for Halloween

Paper Bag Luminaries for Halloween

October 7 by Janssen

simple paper bag halloween luminaries - perfect project to make with kids

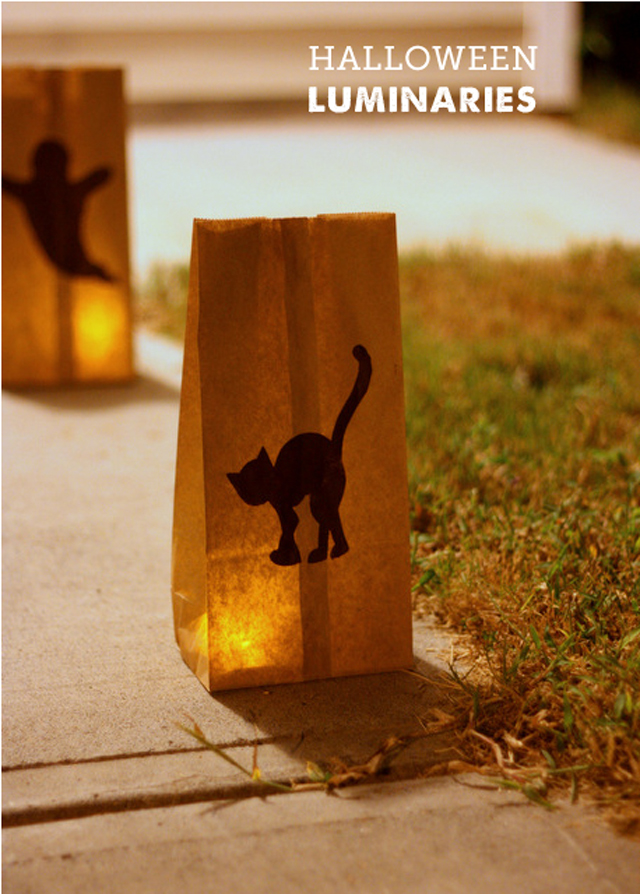
I love the look of luminaries, but they don’t just have to be for Christmas. With some inexpensive paper lunch sacks and some craft paint, you can make some easy Halloween versions that will look great welcoming trick-or-treaters up to your front door.

Using LED tea lights means you don’t have the fire risk and you still get that flickering look that’s festive and a little bit spooky.

Supplies needed:

  • Brown paper lunch bags
  • Paper
  • Cardboard
  • Craft knife
  • Painter’s tape
  • Black or brown craft paint
  • Sponge brush
  • LED tea lights (I bought mine at Lowe’s)

Draw or print an outline on your white paper (I am the world’s WORST artist, so I definitely went the printing option).

IMG_1444

Place your paper stencil on top of the cardboard and, with your craft knife, carefully cut it out.

IMG_1448

Using painter’s tape, attach your stencil to the bag.

IMG_1454

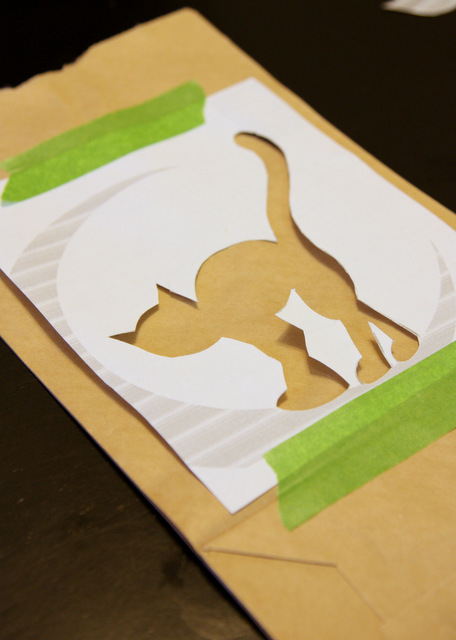
Holding it flat with one hand, sponge paint it in (make sure to use up and down motions, rather than wiping motions, so it doesn’t bleed).

IMG_1460

Remove the tape and peel off your stencil.

IMG_1461

Let your stencil dry, then open the bag and place an electric tea light inside.

Set outside (if it’s extra windy, you may want to add a few rocks to the bottom of the bag to keep it from blowing over) and admire your handiwork.

IMG_1337

*Post contains affiliate links.


Get Your Free Printable

Subscribe to our newsletter today and get our free printable... No More, "Mom, I'm Bored!"

Success! Now check your email to get your No More "Mom, I'm Bored!" Printable... Refer to it whenever the kids get restless!

There was an error submitting your subscription. Please try again.

Powered by ConvertKit
The following two tabs change content below.
  • Bio
  • Latest Posts
My Twitter profile

Janssen

Blogs at at Everyday Reading
Janssen is a former librarian and avid reader who is always maxing out her library card. She now stays at home with her three young daughters (with another girl on the way) and blogs about books for readers of all ages, her favorite recipes, and parenting adventures at Everyday Reading.
My Twitter profile

Latest posts by Janssen (see all)

  • Top 10 Parenting Books for Raising Boys - July 22
  • Honk! Books for Your Truck/Train/Car-Loving Child - March 25
  • 10 St. Patrick’s Day Books for Kids - March 10
Share5
Pin244
249 Shares

Filed Under: Art + Kid Crafts, Holiday, Holiday Projects, Janssen Tagged With: DIY Halloween decor, Halloween crafts, halloween decor, halloween projects for kids

Get your kids' kit

  • Facebook
  • Instagram
  • Pinterest
  • xing

Finally Get Organized

Our Famous Gift Guides

MPMK's Famous Gift Guides

Find the Perfect Toy!

Copyright © 2022 · Parallax Pro Theme on Genesis Framework · WordPress · Log in