
Here’s something fun. Continuing with our focus on tangible ways to eat better, parent better, organize better and just generally live better this year, we’re partnering with Ella’s Kitchen over the next two months to bring you a collection of our favorite sensory play ideas for babies and young kids.
We’ve covered our fair share of sensory play ideas here on MPMK, but I’m not sure I’ve ever really gone into why we love these activities so much. For an excellent primer on the benefits of sensory play for young kids, check out this post from one of my favorite parenting experts, Amanda at Not Just Cute.
She goes into a lot more detail but, suffice to say, kids are basically little scientists – doing all they can to learn about their world – and from day one their best method for doing so is through their senses. In fact, Amanda says, “As they are better able to use their senses, they are then better able to learn through their senses.”
Furthermore, sensorial play with food makes our little ones better eaters for life. And that’s exactly what Ella’s Kitchen is all about – creating good little eaters with nutritious, delicious foods for our kiddos!
So how about we get started with activity #1? Here’s Kaley with an awesome homemade scented slime idea.
Few things are more fun to play with than slippery, slimy, gooey slime. And rainbow colored, glittery, scented slime? That is about as good as it gets. This fun multi-sensory activity is perfect for all ages and super easy.
Instructions
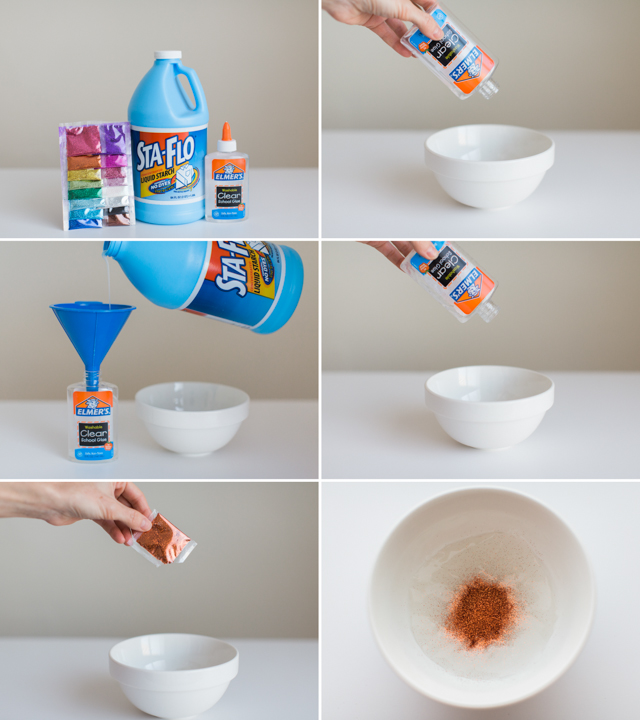
1. Gather your materials:
- Sta Flo Liquid Starch
- Elmer’s Clear School Glue
- Colored Glitter
- Essential Oils or Extracts
2. Pour the bottle of glue into a bowl.
3. Fill the empty glue bottle with liquid starch.
4. Add almost all of the liquid starch to the bowl of glue.
5. Add as much glitter to the mix as you want. You could also substitute food coloring if glitter isn’t your thing.
6. Add a few drops of essential oils or extracts to your slime. (Add enough so that it is nicely scented, but not so much as to overwhelm your child. Depending on the strength of the essential oil, usually a drop or two is all you need.)
We used lavender essential oil, peppermint essential oil, orange essential oil, tea tree oil, mint extract, and vanilla extract in our slime. The vanilla extract and the orange essential oil scented slime was our favorite.

Once everything is in the bowl, have your kids stick their little hands in and start mixing it up. (No spoons allowed…this is what sensory activities are all about!)
The mixture will start out very watery, then get clumpy before it turns a bit stringy like spaghetti. Finally, it will start coming together into a nice slime. If it gets too solid feeling, add more liquid starch. If it is too watery or stringy, add more glue.

While they are mixing it up, talk about what is happening in the bowl. Depending on how old your kids are, ask them to explain how the slime looks, feels and smells, and use this as an opportunity to introduce new words into their vocabulary.
Once the slime is the right consistency, take it out of the bowl and have fun! It will ooze and slither and slip, just as slime should.

Store your slime in ziplock bags, jars, or any other type of sealed container and it will keep for quite a while. If it ever starts to feel too hard, just add more liquid starch and squish it together until it is combined.
A few notes:
- This is one project where the brand of materials you use really does matter. In order for the slime to come out right, you need to use Elmer’s Glue and Sta Flo Liquid Starch. You can find Sta-Flo online or at WalMart next to the laundry detergent. (I’m sure there are other stores that carry it as well, I just haven’t seen it anywhere else)
- You can color your slime with glitter, food coloring, or both! I am all about making things easy, so I used colored glitter. I found the pack of multiple colors shown above at my local craft store. A little bit of the glitter may stick to your hands after playing with the slime, so if that scares you, it may be better to use food coloring.
- You don’t have to add the liquid starch to the glue bottle, I just think it is easier than measuring everything with a measuring cup. The ratio is almost 1 part liquid starch to 1 part glue.
- While adding glitter, color, and/or scent to the slime is completely optional, it makes the activity so much more fun for the little ones.
- Instead of mixing everything together in a bowl, you can pour everything into a ziplock bag and seal it, then shake it up to form your slime. This saves a little bit of clean up but then your kiddos will miss out on all of the fun of feeling the mixture go through the different phases before finally coming together into slime. Go ahead and let them get their hands dirty, it’s the best part!
- This recipe was originally posted here as borax-free but a reader pointed out that, although borax isn’t a main ingredient as it is in other slime recipes, the liquid starch does contains some borax (thank you for that info.!). Both with and without the presence of borax, the slime is not safe to eat. Please watch your little ones closely while playing with it and wash your hands thoroughly when you’re done.
We have lots more great sensory ideas coming over the next two months, but in the meantime be sure to checkout our new collaborative Pinterest board with Ella’s Kitchen – Activities to Help Your Little Ones Become Good Little Eaters!
Thanks again to Ella’s Kitchen for sponsoring this special series! To find out more about Ella’s Kitchen organic baby food and how it’s good in every sense, visit:
Get Your Free Printable

Subscribe to our newsletter today and get our free printable... No More, "Mom, I'm Bored!"
Latest posts by Kaley (see all)
- 30 Breakfast Ideas for a 1-year-old - October 28
- DIY Father’s Day Banner & Card - May 28
- Making Snowmen… Inside! - February 12