I’ve got something great to share with you guys today. In an effort to continue to fill our photography & memory making section with do-able ideas for busy parents, I’ve persuaded Andrea Genevieve Michnik from the Tiny Prints Blog share with us a really lovely family tree project.
You can do this one on your own or with the kids and there’s even a free printable template to make sure you can’t mess it up. That’s my kind of project!
Here’s Andrea…
Teaching kids about their heritage is a great idea during the family-centric holiday season, and making it a hands-on activity only takes a few simple supplies.
With this easy project, you can get everyone involved at your next holiday gathering, or create a family tree to put on display for aunts, uncles and grandparents to see when they visit. Family trees also make great gifts!
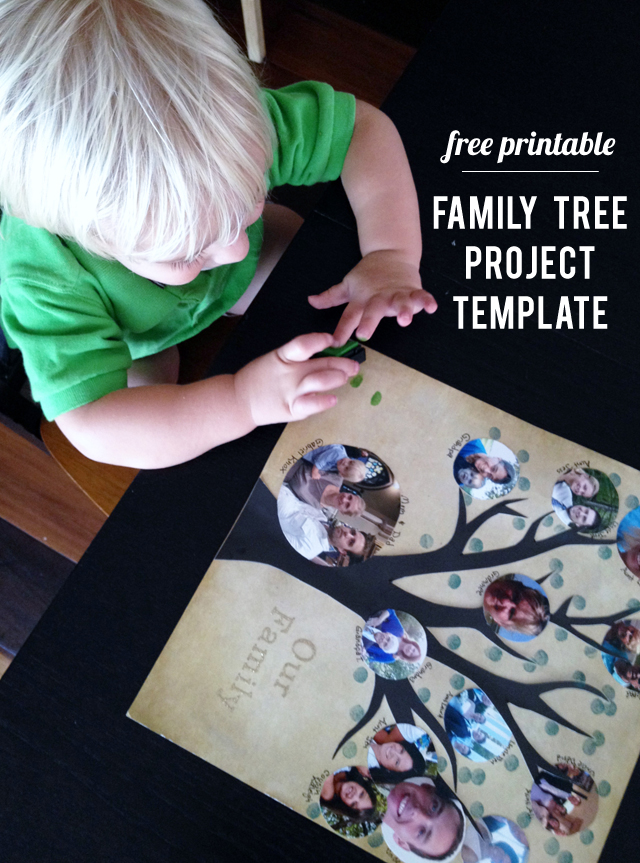
Just download the free printable template, print a few family photos and gather some supplies from your local craft store to be all set to make your own.
FAMILY TREE TEMPLATE PDF DOWNLOAD

Supplies
- Family tree template download (above)
- Two 16” X 16” pieces of cardstock (or three if you’d like the finished product to have a frame or border)
- Glue
- Multicolor stamp pads
- Photos of individual or group family members
- Small circle template (I usually use a juice glass, something that is around 1–2″) or a 1″ circle punch
- Scissors
- Alphabet stickers
- Permanent marker or paint marker
- Paper towel or wet cloth
Instructions:
1. Print the tree template and cut out the tree shape.
2. Trace the tree outline on your piece of card stock using the marker. Cut this out and glue it to a lighter colored piece of card stock with enough room to add leaves to fill each branch.
3. Choose which family photos you want to include on the tree. Print photos using your favorite photo processor.
4. Figure out how to arrange your photos — and don’t forget that kids and siblings should be located near their parents.
5. Use your circle template or circle punch to cut out your photos in uniform sizes.

6. Glue the photos near the branches of your tree.
7. Once you have all the photos in place, pick the colors for the leaves. You don’t have to stick with traditional colors. Depending on the season, you can choose a variety of fall colors, spring greens, Valentine reds, or select your own color scheme.
8. Be sure to wash your hands to clean them of any residue before you start using the stamp pad.
9. Use your finger or thumb and the ink pad to stamp leaves all around your photos near the tree branches. If kids are helping you with this project, you might want to assign each person one color. It’ll be easier for them to get just one finger dirty. If you’re doing it yourself, pick one finger for each color.
10. Add the names of family members to your tree.

11. Give your tree a fun title and you’re all set to show it off!
Here are a few other suggestions for alternative family tree projects to create this holiday season:
For even more ideas on how to take better photos, how to organize them, and what to do with them, check out our other Photography & Memory Making posts.
Andrea Genevieve Michnik is a mompreneur, serial crafter and blogger living in Austin, Texas. A small business maker herself, Andrea is a strong advocate for fellow female entrepreneurs in the area, and she regularly speaks to women about how they can empower themselves professionally. Andrea shares her insights and mommy-inspired projects on the TinyPrints blog, and you can find out what she and her two-year-old toddler are up to via her Twitter and personal blog.
Get Your Free Printable

Subscribe to our newsletter today and get our free printable... No More, "Mom, I'm Bored!"