
I already lamented earlier this week about the hard time I had coming up with a good Father’s Day gift last year. In the end I was successful, read all about it here, but a whole year has gone by and I’m having the same problem. I always seem to default to a photo gift of some sort. Maybe it’s because my kids are still so young that they change A LOT from year to year and I like to give the hubs mementos of how small they once were.
This year I’m once again going the photo route but I’m trying to do something a little more “manly”. So I went to the web for inspiration and came across the, now iconic, Obama “Hope” poster. I thought it would be cool to do something similar with a photo of my husband and each kid.
I haven’t quite figured out what I’m going to do with the photos yet – poster, ipad case with one on each side, calendar?? If you have any bright ideas, please share them in the comments! In the meantime I’ll share with you the step-by-step of how I made the above picture using Photoshop Elements. Click through for the goods.

Once you’ve opened your photo in PSE Elements, go to the “Filter” tab at the top of the screen. Select “Artistic” and then “Poster Edges”.

The only slider I played around with was the one on the bottom called “Posterization”. I went with a value of “1” and hit “OK”.

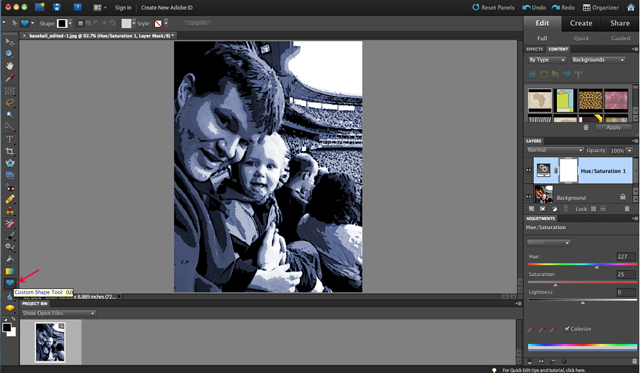
Next select the “create new layer” button on the right had side of the screen (the one that’s a half white and half gray circle above). Then select “Hue/Saturation”.

Check the “Colorize” button at the bottom.

Now the fun part – choose your color by moving the “Hue” slider to the left or right. If you want the exact color that I used, type “227” in the value box. It’s also a good idea to play with the “Saturation” and “Lightness” values a little until you get the effect you’re going for. (I used “25” for Saturation and “0” for Lightness).
Now we’re gonna add the text to the bottom. Select the “custom shape” tool in the left tool bar (looks like a heart).

At the top of the screen you can change which shape you’re using. Select either a square or a rectangle.

You can also select the color (I chose black). Once you’ve made your selections, draw a square in the bottom corner of the photo.

Then select the “move” tool (looks like a cursor arrow) and stretch the square into a rectangle that covers the bottom of the photo.

Select the “Horizontal Type” tool (looks like a “T”). Again, you can change the font, color, and size at the top of the screen. Once your selections are made, type in your words.

If the text isn’t showing up, highlight the text layer on the right of the screen. Then select the “Layer” tab up top and go to “Arrange” and “Bring to Front”.

One last, optional, step is to play around with the brightness and contrast sliders. To do this, once again click on the “create new layer tab” and select “Brightness/Contrast”.

That’s it! Now just save your photo and use it to make a T-shirt… coffee mug?… mouse pad? Seriously guys – someone please help me!
Similar Stuff:
Get Your Free Printable

Subscribe to our newsletter today and get our free printable... No More, "Mom, I'm Bored!"