Our post on How to Store Your Digital Photos Like a Professional Photographer was so popular that we decided to follow it up with another Project Organize Your ENTIRE Life post on how to organize print photos from our resident professional organizer, Annie.
She’s got a fool-proof 5 part process you’re sure to love!
While the majority of us have shifted into the digital realm most households still have a stockpile of family pictures.
Printed at the local drugstore some several years ago, these pictures were meant to bring joy, were intended for auspicious photo albums, for scrapbooking, or for framing… and then, instead, were abandoned in their paper envelopes (that’s hopeful) in favor of more pressing daily tasks.

Luckily, rescuing your precious family photos from a life of clutter is easier than you might think. Here’s how to whip your pictures into shape.
Step 1: Gather
Go on a hunting expedition throughout your house for any and all photos. You might even enlist the kids help on this one (prizes for finders!).
Check drawers, closets, basements and so on, collecting the pictures you discover in the process and gathering them into a central spot. Choose a surface where you can spread out, like a table, or the floor of a room that won’t get disturbed.
Step 2: Sort
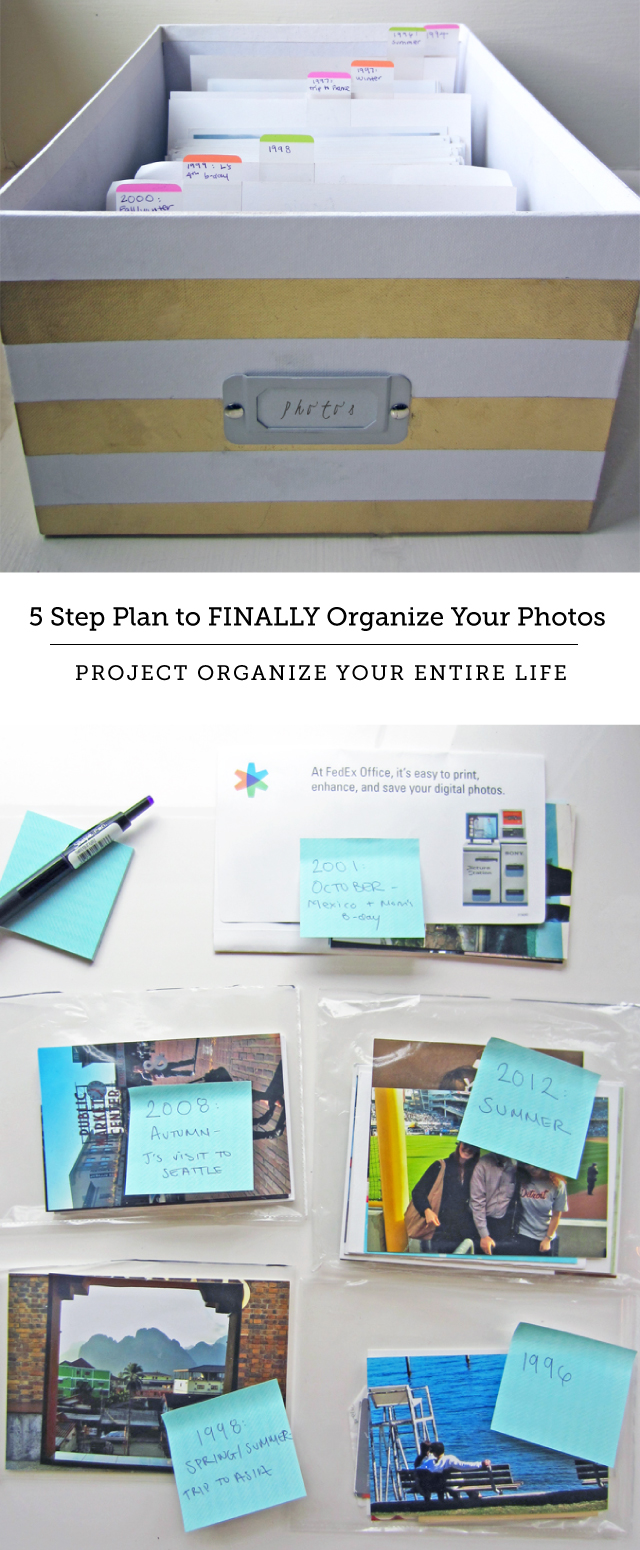
Sort the photos chronologically.
Create a pile for each year you uncover, and mark it with a post-it note. Begin with the obvious pictures, which might be the most recent, or the ones that have been kept together in envelopes. Doing so may help you piece together the years of more obscure photos.
You’ll want to aim to at least identify the year of the photo but, if possible, you can further sort by distinguishing between seasons (2014: Winter) and, even further, by occasion (2014: Winter- L’s 4th birthday party).
Use paper envelopes or plastic sleeves to keep piles distinguished while sorting.

Step 3: Edit
As you’re sorting through your photos, discard those that aren’t worth keeping (you’re allowed, really). Any prints that are out of focus, blurry, or too dark to decipher should automatically get the toss.
You should further refine your photos too. You might, for example, have three similar shots of your kids posing on the front stoop with their popsicles from that one summer when everyone somehow magically behaved. Don’t feel obligated to keep all three copies. Choose the best one, and discard the others.
The same goes for duplicates–keeping one copy is generally sufficient. If you think someone else might like the duplicate (like grandparents, old friends featured in the photo, etc.) you might send it onto them. Otherwise, give them the toss.
If negative strips are still in their original developer’s envelope–and the pictures are there, too–you might as well keep them. But if you don’t know where negative strips came from, if, when you hold them up to the light, you don’t see anything earth-shattering, or if you just feel that dealing with them is more of a bother than a benefit, you can safely get rid of them.
If getting rid of negatives makes you feel overly anxious, I recommend protecting them by using negative storage sleeves.

Step 4: Storage
While photo albums are easily perused, assembling them is quite time-consuming. Most of the time, photo albums never manage to come to fruition. This is true even after people purchase the necessary supplies – I’m telling you, the abandoned, still-wrapped-in-plastic-albums I find in clients’ homes!
A far easier storage route is to use photo storage boxes. These will generally hold around a thousand pictures each. You can purchase photo boxes with internal cases, or you can insert 4 x 6 dividers. If you need to be economical, you can even use a shoebox (although you might want to dress it up a bit first with some attractive wrapping).
For older photos that need more protection, choose an archival storage box, which will protect from yellowing and fading.
Step 5: Label
Transfer the identifying details on your sorting post-its to your ultimate storage system. Label the outside of each photo case or divider tab, and place photos in their respective sections.
Photos that were already together in the developer’s envelope can stay within them if you like, just make sure to label the outside of those as well.

For added flexibility of placement, the dividers seen here were used with writable post-it tabs.

Use as many boxes as you need to house the entirety of your picture library.
Finally, label the outside of the box (or boxes) and you’re all set.

I hope the simplicity of this project will inspire you to organize your own pictures – it really won’t so bad, I promise.
Let us know how it goes in the comment section below. For more organizing tips and lessons in how to Live Simply, head on over to my blog.
Oh, and speaking of photo organization and storage, did you hear?
Amazon Prime now include UNLIMITED photo storage (plus 1,000,000 songs, 40,000 movies & TV shows, a kindle lending library, and free 2-day shipping). Get your free 30 Day Trial here.
*Post contains affiliate links.
Get Your Free Printable

Subscribe to our newsletter today and get our free printable... No More, "Mom, I'm Bored!"